How to create a wavy line in Illustrator such as 3D
Hi mates, you might have seen my last Illustrator tutorial where I demonstrated how to create a moire effect in Illustrator? In this sequence, I would like to present another related tutorial illustrating how to build a wave like the waves of the sea. (I'm a little confused about its name, but it's quite well known as the Moire Effect).
Let's begin with going,
1. Draw a line by Rectangle Tool (M) Height about 22px.
2. Make a copy (Alt+Right Click) drag it to place like below.
Here the distance between two lines about 243px.
3. Go to Object on top menu > Blend > Blend Options...you'll see a pop-up box. Now go to Spacing, scroll down to choose Specified Steps. Make 5 steps here. (To know more in details About blended objects )
4. Once more, Go to Object > Blend > Make (Shortcut is Alt+Ctrl+B) Now you'll see the new 5 steps or line which will be 7 in total.
5. Select it and go to Object > Envelope Distort > Make with Warp... (Shortcut: Alt+Shift+Ctrl+W) Here you'll see another pop up box called Warp Options. Let's started to modify the red lines like below. Press OK
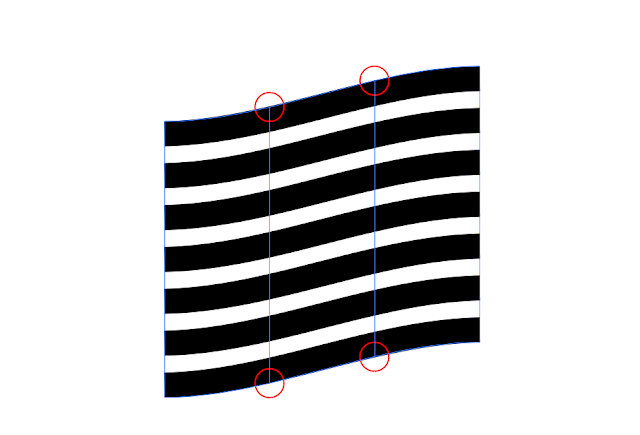
6. Select Direct Selection Tool (A), and edit the 4 anchor points (I mentioned them by red circles).

Actually, I want to make them straight 180 or 0-degree angle. You just keep the Handle of the Anchor Points. Drag it with Shift key.
Result
Result
8. Now we're at the very last end. Here you need to play with those anchor points again, but in a different way. See the below what I've done. Select the Anchor Points, individually by Direct Selection Tool and Drag them.
Excellent, You've done, finally.
Bijutoha
SEO & Graphic Design Expert
With over 10 years experience as a graphic designer. Bijutoha focuses on helping brands develop meaningful and relevant contents by mastering the knowledge of graphic design and link building strategies. Presently, Bijutoha is collaborating with a UK-based clipping path brand.


No comments:
Post a Comment